Serialized Pipeline with SerializeReference
Introduction
What is a serialized pipeline?
We're using pipeline in a reductive sense, as in general pipelines can get very complicated (rendering pipeline). Our definition of a pipeline is an array of pipes that get executed in order and which may contain some additional data. The second clarifier is in the serialization so our specific pipeline lives as an asset rather then fully in code, which has it's own benefits. Lastly the pipeline decides which pipes to include and how to order them, making the system modular.
Why use a pipeline?
Many real-world processes can be defined using this pattern. For instance, a manufacturer's assembly line is a perfect example of a pipeline. Or a game strategy can be defined in a pipeline, there are factors that we evaluate first, before deciding to use more niche approaches. What can be defined in the real world often translates well into the structure of a video game and so here we are, making a pipeline.
Key parameters to our pipeline
-
One asset per pipeline definition.
- This helps prevent reference conflicts between pipelines (the design outlined naturally flows towards this outcome, while still allowing reference assets if needed). A significant advantage is the simplicity of seeing everything upfront rather then using something like asset nesting, which can complicate the authoring process, especially when trying to keep the entire pipeline context in mind.
-
Data and execution independence.
- We define only an interface, with the implementing struct or class handling both execution and serialized data.
SerializeReference attribute is key to this process, as it enables the serialization of interfaces (or abstract classes), making our pipeline both data- and implementation-agnostic. However, while SerializeReference plays an important part, most of the setup lies in creating custom inspectors and the use of reflection.
Quick bullet-points
Benefits:
- Designer-friendly: Designers can tweak the pipeline without coding.
- Doesn’t require recompile after modifying data or order (avoiding making unity into a loading screen).
- Modular
Drawbacks:
- Renaming pipeline element class will break data bindings (see in Tips how to resolve it).
Requirements:
- SerializeReference
- Reflection
- CustomEditor
- (Optional) Custom attribute
Examples:
- Custom build pipeline
- Asset validation pipeline
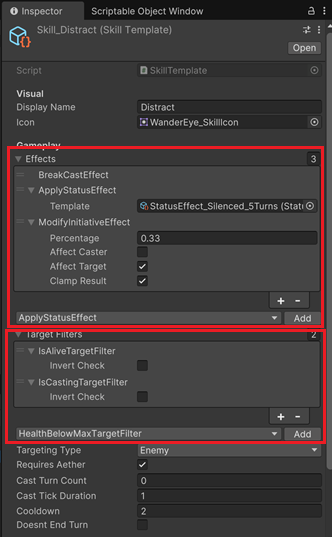
- RPG skill effects pipeline
Steps
Setup
Let's start by creating a SkillTemplateSO ScriptableObject that will hold an array of effects to be applied to the target unit when a skill is cast.
[CreateAssetMenu]
class SkillTemplateSO : ScriptableObject
{
	[SerializeReference] private ISkillEffect[] _effects;
}

interface ISkillEffect
{
	public bool CanBeApplied(Unit target);
	public void Apply(Unit target);
}
Now we have the SerializeReference part done. Let’s add some concrete skill effects we could use in-game.
struct DamageSkillEffect : ISkillEffect
{
	[SerializeField] private int _amount;
	[SerializeField] private DamageElement _element;

	public bool CanBeApplied(Unit target)
		=> !target.isInvulnerable && target.isAlive;

	public void Apply(Unit target)
		=> target.DealDamage(_amount, _element);
}

struct ReviveSkillEffect : ISkillEffect
{
	[SerializeField] private float _healPercentage;

	public bool CanBeApplied(Unit target)
		=> !target.isAlive;

	public void Apply(Unit target)
		=> target.Heal(target.maxHealth * _healPercentage);
}
At this point, everything looks good. However, Unity’s default inspector won’t allow us to populate the SerializeReference array with our newly created effects.
There are two approaches to solve this, which I’ll outline below:
- [A] A simple and direct method.
- [B] A more advanced but reusable approach.
[A] Direct method
We can dedicate a special custom editor for handling the enumeration and addition of new elements.
[CustomEditor(typeof(SkillTemplateSO))]
public class SkillTemplateSOEditor : Editor
{
    private SkillTemplateSO _target;

    private Type[] _skillEffectTypes;
    private string[] _skillEffectTypesNames;
    private int _selectedSkillEffectIndex;

    public void OnEnable()
    {
        _target = (SkillTemplateSO) target;
        _skillEffectTypes = FetchSkillEffectTypes();
        _skillEffectTypesNames = _skillEffectTypes.Select(effectType => effectType.Name.Split('.')[^1]).ToArray();
    }

    public Type[] FetchSkillEffectTypes()
    {
        Type skillEffectType = typeof(ISkillEffect);
        return skillEffectType.Assembly
            .GetTypes()
            .Where(type =>
                skillEffectType.IsAssignableFrom(type) &&
                type != skillEffectType && !type.IsAbstract
            ).ToArray();
    }

    public override void OnInspectorGUI()
    {
        DrawDefaultInspector();

        GUILayout.BeginHorizontal();
        _selectedSkillEffectIndex = EditorGUILayout.Popup(_selectedSkillEffectIndex, _skillEffectTypesNames);
        if (GUILayout.Button("Add Effect"))
        {
            var newEffect = (ISkillEffect)Activator.CreateInstance(_skillEffectTypes[_selectedSkillEffectIndex]);
            Array.Resize(ref _target.effects, _target.effects.Length + 1);
						_target.effects[^1] = newEffect;
        }
        GUILayout.EndHorizontal();
    }
}
[B] Contextual inspector attribute
The improved approach contains 2 parts. The first part involves creating a custom AddToArray attribute, which can draw the required inspector extensions once context is provided. The second part involves creating a base custom editor for SOs that supplies the context and overrides Unity's default inspector rendering.
[AttributeUsage(AttributeTargets.Field)]
public partial class AddToArrayAttribute : Attribute
{
    public string buttonText;
    public AddToArrayAttribute(string buttonText)
    {
        this.buttonText = buttonText;
    }
}

#if UNITY_EDITOR
public interface ISerializedPropertyAttributeInspector
{
    public void Init(UnityEngine.Object owner, SerializedProperty property, FieldInfo fieldInfo);
    public bool DrawProperty();
}


public partial class AddToArrayAttribute : ISerializedPropertyAttributeInspector
{
    private SerializedProperty _property;
    private int _selectedIndex;
    private string[] _dropdownOptions;
    private Type[] _types;
    private bool _isValid;

    public void Init(UnityEngine.Object owner, SerializedProperty property, FieldInfo fieldInfo)
    {
        if (!property.isArray)
        {
            _isValid = false;
            return;
        }

        _property = property;
        var fieldValue = fieldInfo.GetValue(owner);
        var fieldValueTypeName = fieldValue.GetType().ToString();
        var fieldNonArrayTypeName = fieldValueTypeName.Substring(0, fieldValueTypeName.Length - 2);
        var fieldNonArrayType = owner.GetType().Assembly.GetType(fieldNonArrayTypeName);

        _types = ReflectionHelpers.GetDerivedTypes(
            fieldNonArrayType,
            includeAbstract: false,
            includeBase: false,
            fieldNonArrayType.Assembly).ToArray();
        _dropdownOptions = new string[_types.Length];
        for (int i = 0; i < _types.Length; i++)
        {
            _dropdownOptions[i] = _types[i].Name;
        }
        _isValid = true;
    }

    public bool DrawProperty()
    {
        if (!_isValid)
        {
            return false;
        }

        bool isDirty = false;
        GUILayout.BeginHorizontal();
        _selectedIndex = EditorGUILayout.Popup(_selectedIndex, _dropdownOptions);
        if (GUILayout.Button(buttonText, GUILayout.Width(80)))
        {
            var newInstance = Activator.CreateInstance(_types[_selectedIndex]);
            _property.InsertArrayElementAtIndex(_property.arraySize);
            _property.GetArrayElementAtIndex(_property.arraySize - 1).boxedValue = newInstance;
            isDirty = true;
        }
        GUILayout.EndHorizontal();
        return isDirty;
    }
}

[CustomEditor(typeof(ScriptableObject), true)]
public class BaseSOEditor : UnityEditor.Editor
{
    private List<ISerializedPropertyAttributeInspector> _serializedPropertyAttributeInspectors;

    protected virtual void OnEnable()
    {
        _serializedPropertyAttributeInspectors = new List<ISerializedPropertyAttributeInspector>();

        var type = serializedObject.targetObject.GetType();
        foreach (var fieldInfo in type.GetRuntimeFields())
        {
            var property = serializedObject.FindProperty(fieldInfo.Name);
            var addToArrayAttribute = fieldInfo.GetCustomAttribute<AddToArrayAttribute>();
            if (addToArrayAttribute != null)
            {
                addToArrayAttribute.Init(serializedObject.targetObject, property, fieldInfo);
                _serializedPropertyAttributeInspectors.Add(addToArrayAttribute);
            }
        }
    }

    public override void OnInspectorGUI()
    {
        bool isDirty = false;
        DrawDefaultInspector();
        foreach (var serializedPropertyAttributeInspector in _serializedPropertyAttributeInspectors)
        {
            isDirty |= serializedPropertyAttributeInspector.DrawProperty();
        }
        if (isDirty)
        {
            serializedObject.ApplyModifiedProperties();
        }
    }
}
#endif
The setup may be a bit cumbersome, but offers significant advantages by reducing repetitive patterns. Similarly, you can leverage additional custom attributes to enhance the editor's functionality even further.
Tips
If you lose data bindings because of a rename, there are 2 ways to restore them.
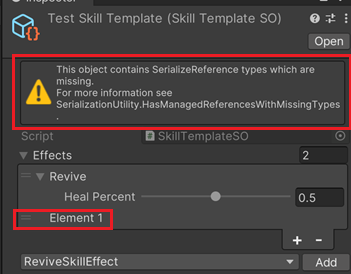
- Open the problematic .asset files and rename lines with
type: {class: OLD_CLASS_NAME, ns: , asm: ASSEMBLY}with a new class name, it will rebind itself on refresh (use regex at your own risk)
effects:
    - rid: 2764383452201484288
    - rid: 2764383452201484290
    references:
    version: 2
    RefIds:
    - rid: 2764383452201484288
        type: {class: ReviveSkillEffect, ns: , asm: Assembly-CSharp}
        data:
        healPercent: 0
    - rid: 2764383452201484290
        type: {class: DamageSkillEffect, ns: , asm: Assembly-CSharp}
        data:
        amount: 1
- Reverting the rename also works
